How to Setup G Suite MX Records (Google Workspace) +SPF, DKIM & DMARC
Everybody hates Google documentation...
Let's face it - it's the fuckin worst.
So, instead of wasting your prime adult years trying to figure out what an MX record is, how to setup SPF, DKIM & DMARC records and why nothing ever works... here's a quick guide showing you all about it.
You'll still prolly be bored to death, but at least there's a light at the end of the tunnel now.
Cheers & stay funky 🦩
👉 Follow along w/ the FREE CHECKLIST: How to Setup G Suite MX Records Checklist
Setting up MX Records for G-Suite
*Note: I highly recommend following the Free Checklist. I tried to turn my transcription into an article with ChatGPT and it totally ruined it. So.. proceed with caution if you're reading, but proceed with no caution if you are using the resources above!
In this guide, we will learn how to set up MX records for a G-Suite account. MX records are used to determine the mail server responsible for accepting email messages on behalf of a recipient's domain. This guide is for adding a new domain to an already existing G-Suite account, but the process is the same for a fresh G-Suite account.
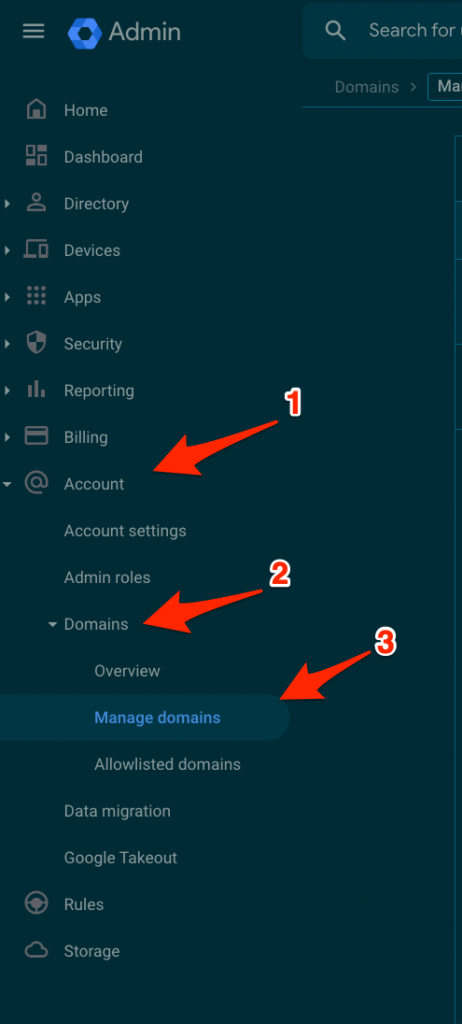
Step 1: Login to G-Suite
Once logged in to your G-Suite account, click on "Account" on the left side and then "Domains". Here, you can see the option to "Manage domains".
Step 2: Add New Domain
Click "Add domain" and start the verification process. You will be prompted to enter your password. The domain name you want to add can either be a secondary domain or a user alias domain. In this case, we want to send emails, so we will go with the secondary domain option.
Step 3: Verify Domain
The next step is to verify your domain. You have the option to do this via text record verification or a different method. The text record verification method is the easiest and involves adding a text file to your server or DNS provider (e.g. CloudFlare).
Once you have added the text file, go back to the G-Suite account and click "Continue". You will now see a prompt to add your verification code.
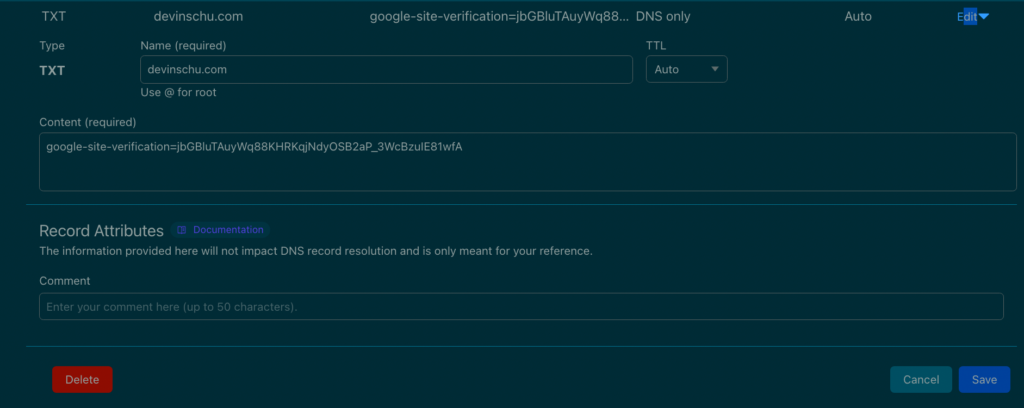
Adding the Text Record
To add the text record, follow these steps:
-
Go to your DNS and click "Add Record".
-
Under "Type", select "TXT" or type it in.
-
In the "Name" field, type "@" or the at symbol.
-
In the "Content" field, paste the text record that you copied.
-
Click "Save".
After adding the text record, verify your domain in Google. This may take a few minutes as Google is slow, but it should be instant if you did it in the Search Console.
Activating Gmail and Setting up MX Records
After verifying your domain, you can activate Gmail and set up the MX records necessary to receive emails.
-
Click "Activate Gmail".
-
Follow the prompts to set up the MX records.
-
If the generic instructions provided by Google do not give you the information you need, you can search for "G Suite MX Records"" for more information.
Adding MX Records to Your DNS
To add the MX records to your DNS, follow these steps for each record:
-
Go to your DNS and click "Add Record".
-
Under "Type", select "MX".
-
In the "Name" field, type "@".
-
In the "Value" field, enter the value of the MX record.
-
For "TTL" or "Time to Live", you can leave it at "Auto" or set it to 3,600.
-
Enter the appropriate priority for each record.
-
Click "Save".
MX, SPF, DKIM, and DMARC Records Setup
Setting up MX Records
To set up MX records, first set the priority of the most extreme record at the mail server to 5. The next two should have a priority of 10. You should be able to activate the records after setting them up.
Setting up SPF Record
Setting up DKIM Record
To set up the DKIM record, follow these steps:
-
Go to the Google Workspace admin console and click on the Gmail option
-
Click on the "authenticate email" option and select the domain where you want to set up the DKIM record
-
Generate a new record with a 2048 prefix and selectors Google
-
Go back to the DKIM setup page and add a new text record. Fill out the name and value fields with the information provided
Setting Up DMARC Records
This article will guide you through the process of setting up DMARC records in order to help secure your email domains.
Signing into the Management Console
First, you need to sign into your management console and locate the page where you update your DNS records. From there, add a new DNS record by entering your text record for DMARC.
Setting Up the Text Record
Configuring the Values
The second field is where you will enter the text for your DMARC record. For example, you can use the following text:
v="DMARC1;" p="none;" rua="mailto:[email protected];" ruf="mailto:[email protected];"
Note that the text record value may need to be adjusted based on your desired settings. The value of p="none" means that no action will be taken when authentication fails. If you want to take action in case of failed authentication, you can use quarantine or reject.
Verifying Configuration
To verify your configuration, you can use the Google Admin Toolbox and its Dig and MX Check features.
Once you have verified your configuration, your MX records, SPF record, and DMARC record will be set up and you can start using them to help secure your email domains.